

Background
Released in March 2017, version 1 introduced already powerful features missing in other tools: flexible event conditions, multiple trigger actions, multiple Maker Webhooks accounts, action delay and even a simulator to help you understand how your ImSmart setup reacts.
Version 2 released
Version 1 was powerful enough for most users but it was still limited in possibilities and growth. Version 2 is a major rewrite where the main concepts have been expanded to allow much more flexibility and give users unprecedented control over their automation. The beauty of the platform is that users can now share their automation scripts and benefit from the knowledge of the community.
Programming is now available and it opens a new world of possibilities. Non-programmers need not worry: you don’t have to be able to program but you will still get the benefits from the improved platform. The first advantage is that a trigger can now do a lot more. Instead of the simple trigger
you can now do

See the Programmer’s Guide for detailed information on how you can program your trigger. You can still define simplified triggers using the condition and action editor the same way as before version 2. You can also define an advanced trigger that will use code you define in Javascript.
The second advantage is that ImSmart is now much more open to third-party integrations. You will notice a new menu named Modules. Listed under Modules you will find modules and connectors that you define, but also modules and connectors that other users have published.
ImSmart v2 introduces the following changes and concepts: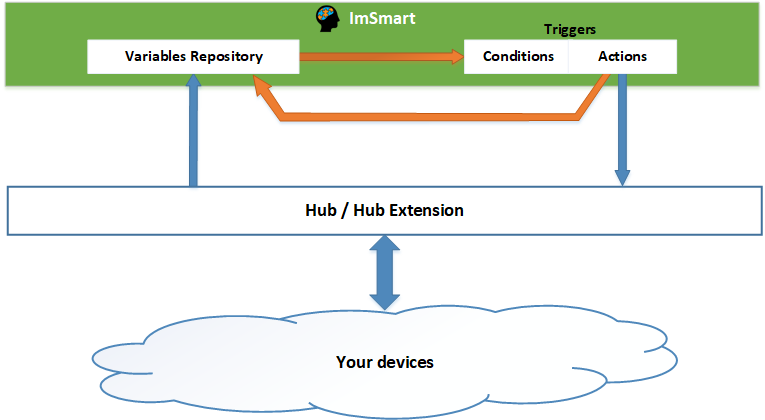
- Hubs and Hub Extensions: What we call a Hub is the hardware hub that you bought (like the Philips Hub hub or the SmartThings hub) and allows you to “talk” to your devices. The hub is the first and main connection to the IoT devices you control. A Hub Extension is a virtual hub or an intermediate to which you “talk” to control your IoT devices. For example IFTTT is a Hub Extension.
- Modules: Small piece of code that can be reused in one or many of your triggers scripts or by a connector action.
- Connectors: Special modules that interacts with your devices through a Hub or Hub Extension. A connector will usually focus on one type of device from a manufacturer or one type of service.
- Connector Access: Definition of what is needed to access the specific service targeted by the connector. Usually this will be the credentials to access the service.
What is a module?
A module is program code that can be reused and is executed by a trigger or a connector action. A module can be imported in connector code, in a trigger or even from another module, using the function ImSmart.import. A module can be made public so that it’s available to all users that wish to use it in their own modules, connectors or triggers. See the Programmer’s Guide for more info.
What is a connector?
A connector is a module with access and actions components. A connector allows an ImSmart account to access integrations through a hub or a hub extension. For example there is a IFTTT connector which allows the use of Maker Webhooks API calls. A connector defines remote access parameters (mostly credentials) and how to deal with them. A connector also defines a set of actions that triggers can use to accomplish something. As soon as a connector becomes public, its full definition is available to everyone, including how it is coded so you can verify and understand what it is doing and also use it as an example for programming your own connector.
Let’s see how a connector is defined.
Main Connector Settings
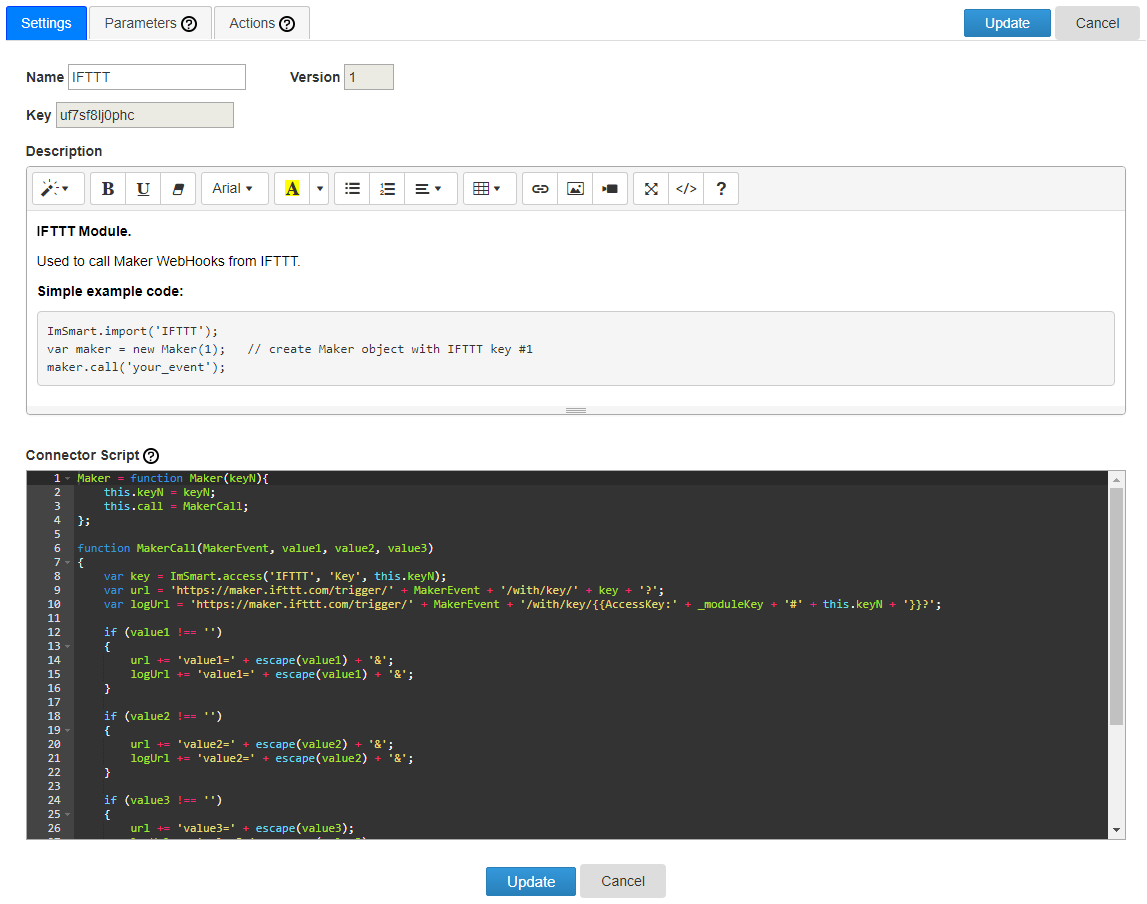
The developer defines the connector name, which should describe the larger entity it represents and not necessarily its action. For example we have the IFTTT connector and not a Maker connector. Maker is the name of the action we call at IFTTT. This allows for more than 1 action to be defined on the same connector and makes it more user-friendly. The version number defines the current version you are currently editing. When you decide to publish your connector to make it available to all users it is sent to ImSmart for revision and approval and, when approved, the connector version number is incremented. By default all triggers using your connector will use the latest version at the time a user defines the connector access (the credentials). A user, though, can use an advanced trigger and access a specific version of your connector.
The Access type defines if your connector you have in development is accessible to other users or is completely private; as soon as you publish a connector, this version becomes public and is accessible to all users. If you make your connector semi-private, the only way they can access it is by programming a trigger and access it through your developer nickname and connector name. More about this later.
Then you describe the connector using a rich editor that allows you to format the description to your needs.
On this first tab, the last part is the Connector Script, which defines the core of the connector. The code you define here is exactly what will run when an action using the connector is triggered and nothing more. It’s up to you to define what you need to call, including what to record in the logs. The code uses the Javascript language which makes it very easy to use and very powerful at the same time. Although it is possible, connector code should not reference any specific variable as it should be made generic. All connectors and modules run in a self-contained environment where your variables as well as connector parameters are pushed in so they are available to the script.
Connector Parameters

The connector parameters define what is required for a user to access the connector. These parameters are the credentials to access the hub or the hub extension. A user that create its access using the IFTTT connector as defined above will see the following:
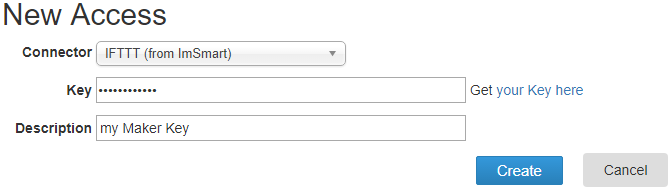
The Description field is part of all access definitions. All other fields are defined as connector parameters. The Variable Name defines the variable that will be injected into the validation script, if any, to validate the parameters entered by the user. Encrypted means that the user value is encrypted in database and shown as a password input on the UI. Mandatory means that the user has to enter a value. This will tell the UI to validate that a value is present. Selecting Mandatory should not prevent you from implementing a check in the validation script so the back end also checks for a value. Unique means that the value should be unique for this user and connector. Parameter Help Text defines the text that is displayed to the right of the field that will help the user understand what value s/he should enter. You should keep the Help Text short. A rich text editor allows you to format the text: select any part of text and a floating toolbar appears. The Validation Script is executed when the user creates or updates the credentials to make sure all data entered is valid. The validation is done by using the variables as defined by Variable Name. Anything to report to the user should simply set the variable _error.
Connector Actions

The last tab defines the connector actions. The connector can have more than 1 action, each action having different inputs. The Variable Name defines the variable that will be injected into the Action Script, which implicitly imports the Connector Script, defined on the first tab. The input Type can be text, in which case text can be entered by the user. If select(Access), then a connector access drop-down is presented to the user and the access sequential number is returned when the Action Script is run. If select(Variable), then a variable drop-down is presented to the user and the variable value is returned when the Action Script is run. Mandatory means that the user has to enter a value. Additional means that this option will be presented under the Additional options of the action.
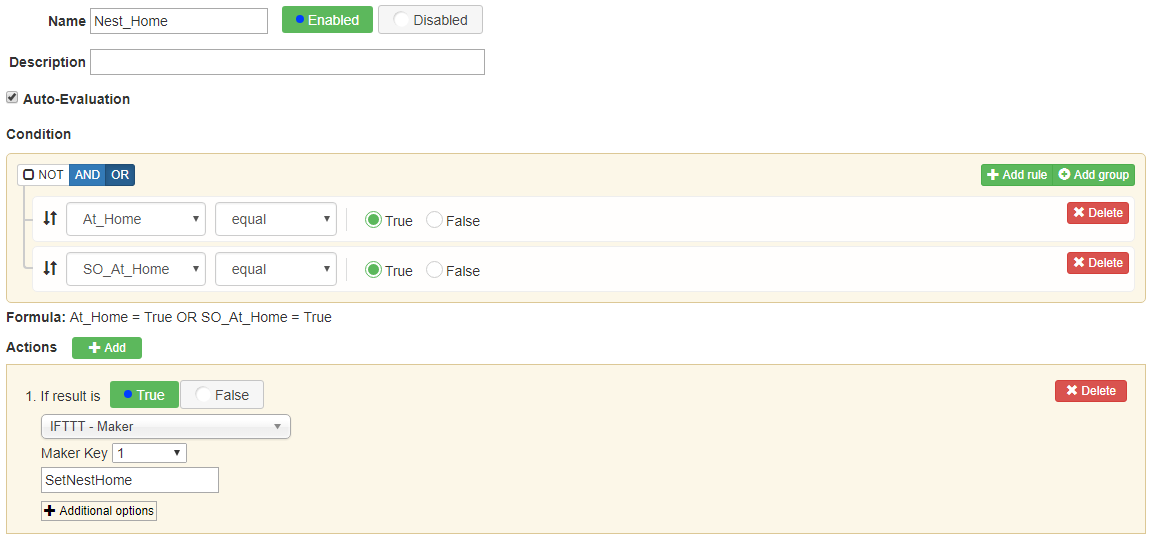
The definition of the connector action defines how it appears in the definition of the action in a simplified trigger:

This allows users that do not program their triggers using Javascript code to be able to use your connector. If you do not define any action, only advanced trigger using Javascript can use the connector.
Publish your module or connector
If you’re serious about your work and want to make your module or connector public you simply need to publish it. By doing so you push your current working module/connector version on the public side your your working version number is incremented.
![]()
When you publish you are asked to choose between Public or Official access. Both makes the module/connector accessible to all users but an Official status will make the module/connector show up higher in the list of public Modules/Connectors. The Official status also requires additional verification of your identity by the ImSmart team.
Any connector publish goes through an approval process at ImSmart where we check the following:
- Your code is secure, fields that should be encrypted are encrypted, etc.
- Your module/connector has the right description and shows at least one code example.
- A connector should have at least one action so that it can be used with simplified triggers, unless there is a good reason not to make one.
If your connector does not follow the requirements, we will ask you to update it and publish again.
When your connector is published and approved, you cannot change its code or definition; you can only make a new version and publish it again.
The Programmer’s Guide (latest update here)
The programming language used in ImSmart is Javascript or more specifically the V8 open-source Javascript engine. You program modules, connectors and advanced triggers using Javascript. The variables you define on your Variables page are variables you can access and set in Javascript. When you set one of your variables value in Javascript, its value is immediately reflected on your Variables page. Triggers associated to the variable are not called when you set a value in Javascript.
All ImSmart scripts run in a self-contained environment where you cannot access any UI or DOM elements. Nevertheless it makes a very powerful and flexible tool. All scripts are time-restricted to 3 seconds. If the script runs longer than 3 seconds, it is aborted and a script timeout is recorded in the trigger activity logs.
All variables defined in ImSmart, either in your Variables repository or in the definition of a connector must follow the ECMAScript 6 valid grammar. Avoid operator keywords as well as ImSmart and _ImSmart in your variable names.
The object ImSmart is accessible and contains the following functions:
- access(connName, paramName, N): Gets the value of an access parameter, given that
- connName is the connector name. connName can be a composite name that references a specific connector version from a specific user using the format username/connName/version. e.g. ImSmart/IFTTT/1, where ImSmart is the developer nickname, IFTTT is the connector name and 1 is the connector version. When you use the format username/connName, the latest version of the connector is used.
- paramName is the parameter name as defined in the Access Parameters section of the connector. Use the Name value and not Variable Name.
- N is the access number as indicated in your Access settings page.
For example, ImSmart.access(‘IFTTT’, ‘Key’, 1) will return the access Key #1 which is needed in a WebHooks call.
- http(url): This function calls a URL as defined by url. When called from the Simulator, the URL is not called but pushed into the virtual log on screen.
- import(name): equivalent of <script src=”module.js”></script> in Javascript that is used to load a module or connector. name can reference a module or connector name and it can be a composite name that references a specific module or connector version from a specific user using the format username/name/version. e.g. ImSmart/IFTTT/1, where ImSmart is the developer nickname, IFTTT is the connector name and 1 is the connector version. When you use the format username/name, the latest version of the module or connector is used.
- log(message): Records a message into a trigger’s activity log. When called from the Simulator, the message is not logged in database but pushed into the virtual log on screen.
The object ImSmart also contains the following read-only values:
- fromSimulation: boolean value that indicates if the script has been called from the Simulator or not.
- fromEvent: boolean value that indicates if the script has been called from a scheduled event or not.
We have a good example in the following IFTTT script:
Maker = function Maker(keyN){
   this.keyN = keyN;
   this.call = MakerCall;
};

function MakerCall(MakerEvent, value1, value2, value3)
{
   var key = ImSmart.access('IFTTT', 'Key', this.keyN);
   var url = 'https://maker.ifttt.com/trigger/' + MakerEvent + '/with/key/' + key + '?';
   var logUrl = 'https://maker.ifttt.com/trigger/' + MakerEvent + '/with/key/{{AccessKey:' + _moduleKey + '#' + this.keyN + '}}?';

   if (value1 !== '')
   {
      url += 'value1=' + escape(value1) + '&';
      logUrl += 'value1=' + escape(value1) + '&';
   }

   if (value2 !== '')
   {
      url += 'value2=' + escape(value2) + '&';
      logUrl += 'value2=' + escape(value2) + '&';
   }

   if (value3 !== '')
   {
      url += 'value3=' + escape(value3);
      logUrl += 'value3=' + escape(value3);
   }

   ImSmart.http(url);

   if (ImSmart.fromEvent)
      ImSmart.log('Scheduled event executed. Called ' + logUrl);
   else
      ImSmart.log('Called ' + logUrl);
}
An object _ImSmart also exists for core functions but only acts as an interface to the ImSmart object. You should generally avoid using this object directly.